- To install Tiny11, download its official ISO image file from NTDEV and mount it onto a bootable drive. Then, boot your PC from the bootable media you created and proceed with the installation.
- Minimum requirements for Tiny11 are 2GB RAM and 8GB storage. The latest update bypasses TPM and Secure Boot requirements.
- Tiny11 is a toned-down version of Windows 11 Pro 23H2, with many official features removed from the installation media.
Whether it’s due to CPU requirement issues or lack of TPM support, you might be facing problems installing the standard Windows 11 operating system. But with Tiny11, such issues can be bypassed. We’ll show you what Tiny11 is, how it differs from Windows 11, and how to install it on your computer.
What Is Tiny11?
Tiny11 is a custom, unofficial version of Windows 11 Pro 23H2 modified to be much lighter and require fewer resources to run. It’s only about 4GB in size, compared to the 20GB of the official Windows 11 installation. This makes it possible to run the operating system on older or less powerful computers that don’t otherwise meet the official requirements from Microsoft.
Note: Tiny11 is independently developed by NTDEV. It’s not affiliated with Microsoft.
What Differentiates Tiny11 From Windows 11?
Tiny11 and Windows 11 share the same core, but they differ in several aspects. Here’s a breakdown of their differences:
System Requirements
Tiny11 has significantly lower requirements, including 2GB RAM and 8GB storage. Still, we recommend having at least 4GB RAM for a smoother system. When it comes to security, it has no requirements for Trusted Platform Module (TPM) or Secure Boot.
On the other hand, Windows 11 needs a minimum of 4GB RAM and 64GB storage. It also needs you to enable TPM 2.0 and Secure Boot as part of its security features.
Features
Windows 11 comes with all official features and apps pre-installed, resulting in a larger size. Tiny11 removes the bulk of this bloatware, including features like Widgets, Microsoft Edge, and Teams.
Tiny11 retains useful features like Magnifier, Narrator, Calculator, Paint, and Notepad for accessibility. The Microsoft Store is also present for convenient downloads. NTDEV leaves most security features, including Microsoft Defender Antivirus, as is.
Support
Unlike Windows 11, security updates to Tiny11 don’t come directly from Microsoft. However, the developers occasionally release new versions of it with updated features and security patches. You can check its download website or online communities for announcements about new releases.
How to Install Windows 11 Using Tiny11
Installing Windows 11 using Tiny11 requires you to download NTDEV’s ISO image release, create bootable media, and boot using your bootable drive. Here’s a more detailed process for you.
Prerequisites
To install Tiny11, you will need the following:
- 2 GB RAM (4 GB recommended)
- 8 GB storage (16 GB recommended)
- An empty USB flash drive with at least 8 GB of storage
- Internet connection for downloading the ISO image
It’s also important that you have a backup of your crucial data. Installing Tiny11 will erase all data on your storage drive, so make sure you have a copy of them before proceeding.
Step 1. Download the Tiny11 ISO Image
Open your web browser, and go to the download page of Tiny11’s ISO image on Internet Archive. NTDEV releases the official version of Tiny11 here, so be careful of other OS versions circulating on the web.
Click Log in to view this item to gain access to the ISO image. Create an account on Internet Archive if you have none yet.
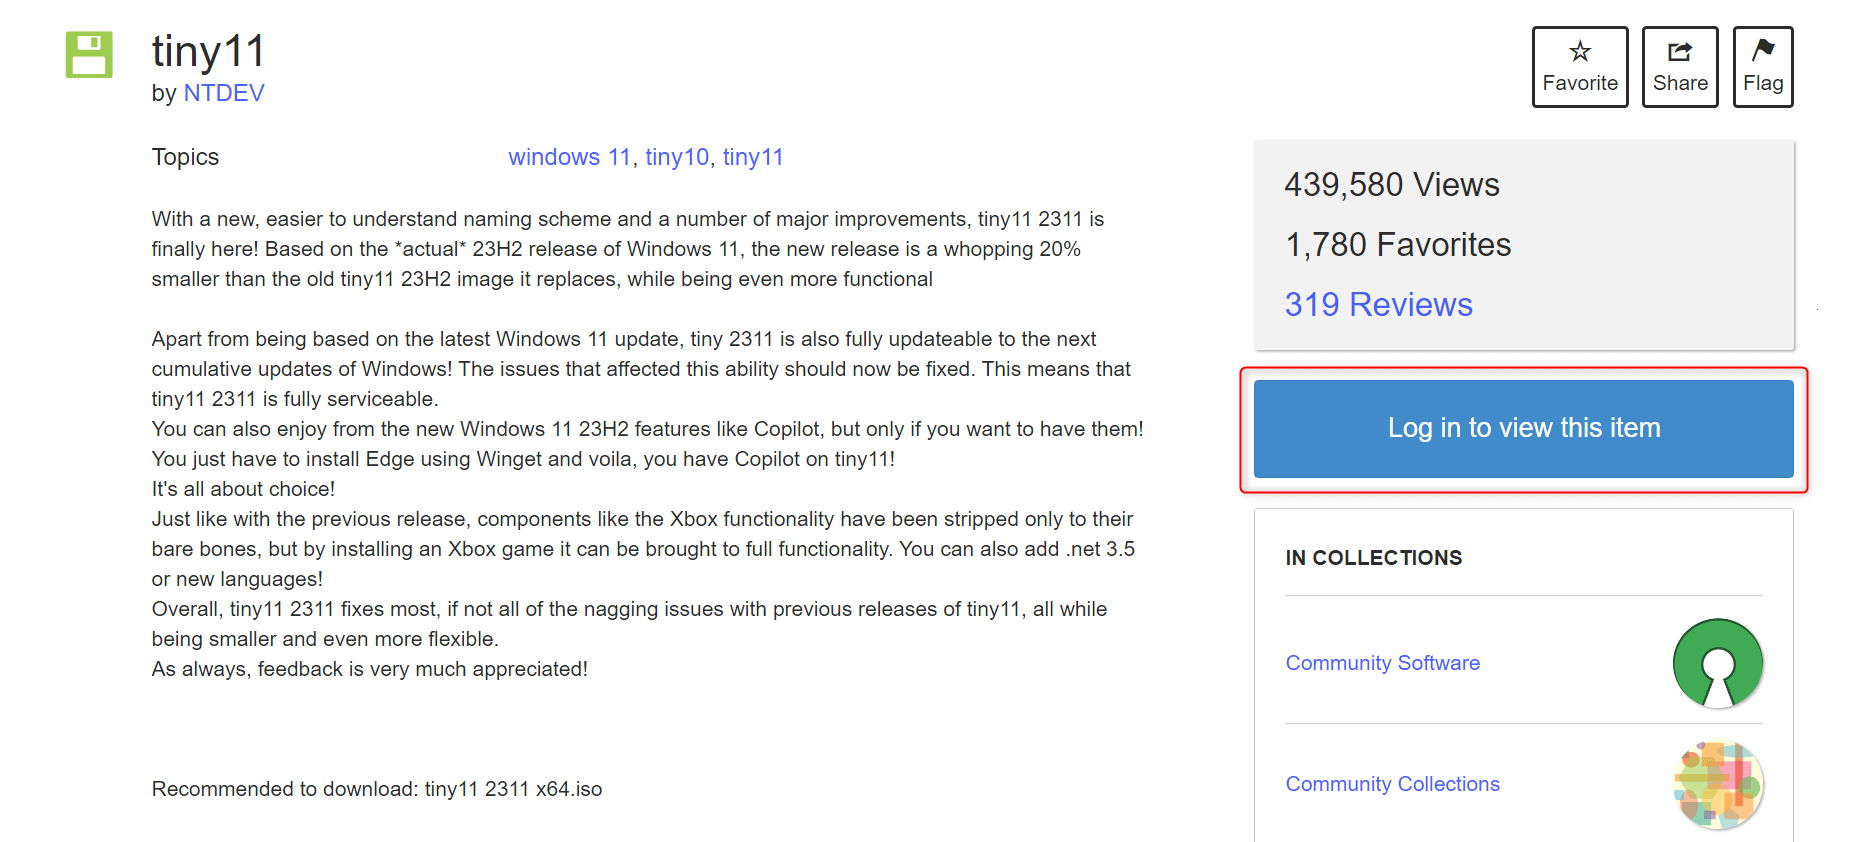
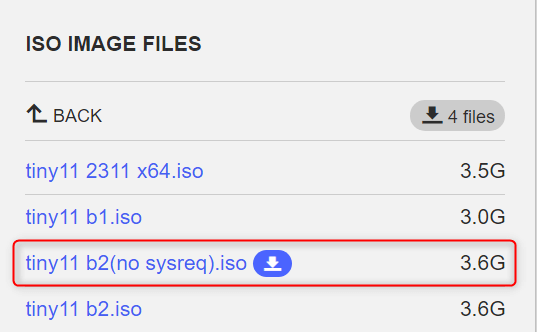
Expand the ISO Image drop-down. If your computer doesn’t meet TPM and other security requirements, choose tiny11 b2(nosysreq).iso from the options provided. Otherwise, you can choose from any of the image files.
Wait for the image file to finish downloading. Note that Internet Archive has a bandwidth-limiting feature, which can make the download process take a few hours.
Step 2. Create a Bootable Tiny11 Drive
Using any media creation tool, create a bootable drive for the Tiny11 ISO image file that you downloaded. While there are many tools out there, we recommend that you use Rufus to ensure an easy and straightforward process. Here’s how.
Plug your USB flash drive to your computer’s port and launch Rufus.
Once it opens, under Device, select your USB drive. Expand the Boot selection drop-down and choose Disk or ISO image (please select). Click Select.
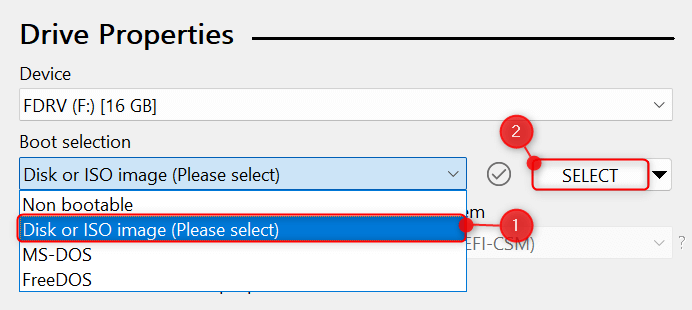
In a file selection window, load the Tiny11 ISO image file you downloaded earlier.
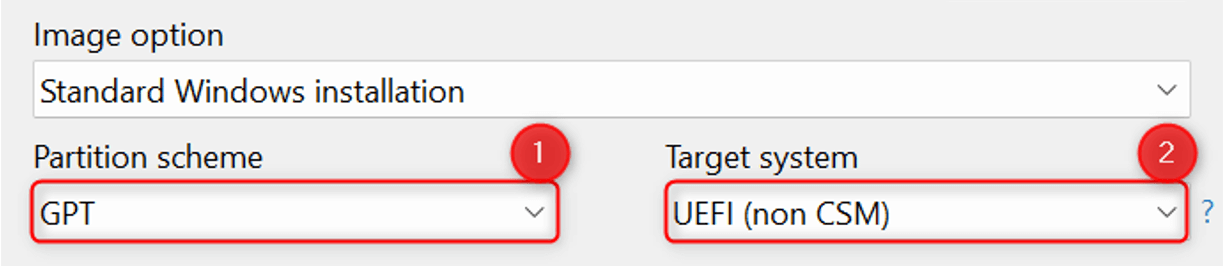
For the Image option drop-down, choose Standard Windows installation. For the Partition scheme, select GPT if your receiving computer’s BIOS mode is UEFI and MBR if it’s the Legacy BIOS. You can check this via the System Information app.
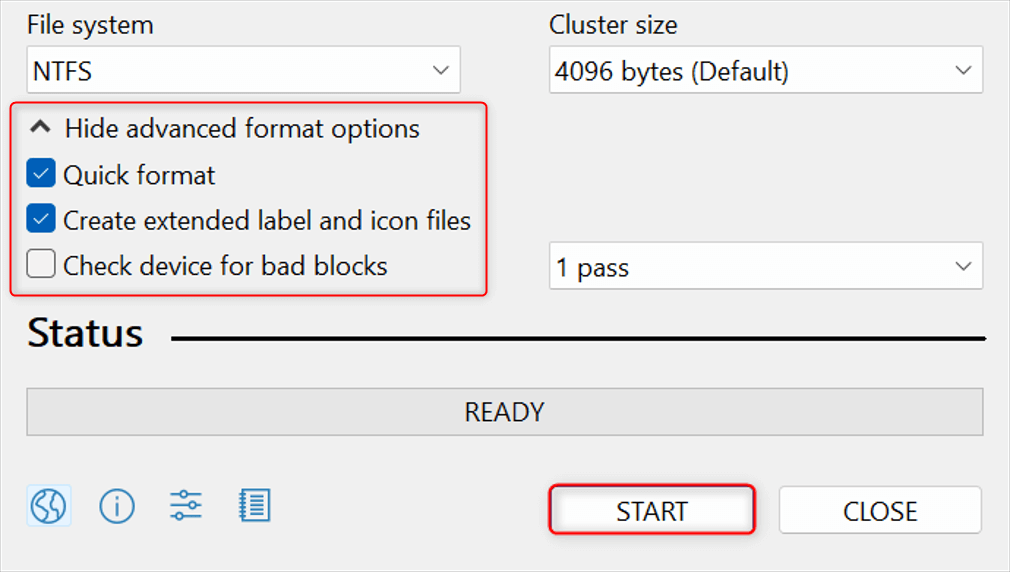
Expand the Show advanced format options drop-down. Then, check Quick format and Create extended label and icon files. Leave all other options as is and click Start.
For a more detailed walk-through, check out our post for creating a Windows 11 bootable USB drive with Rufus. The steps are identical, except that you should swap the Windows 11 ISO image with Tiny11.
Step 3. Boot Your PC From the Bootable Drive
Turn off your computer and plug in your USB into the machine. Then, enter your PC’s BIOS settings. Note that the steps to enter a PC’s BIOS will vary depending on the brand and model of your equipment. Here’s how you enter the BIOS on an Asus laptop.
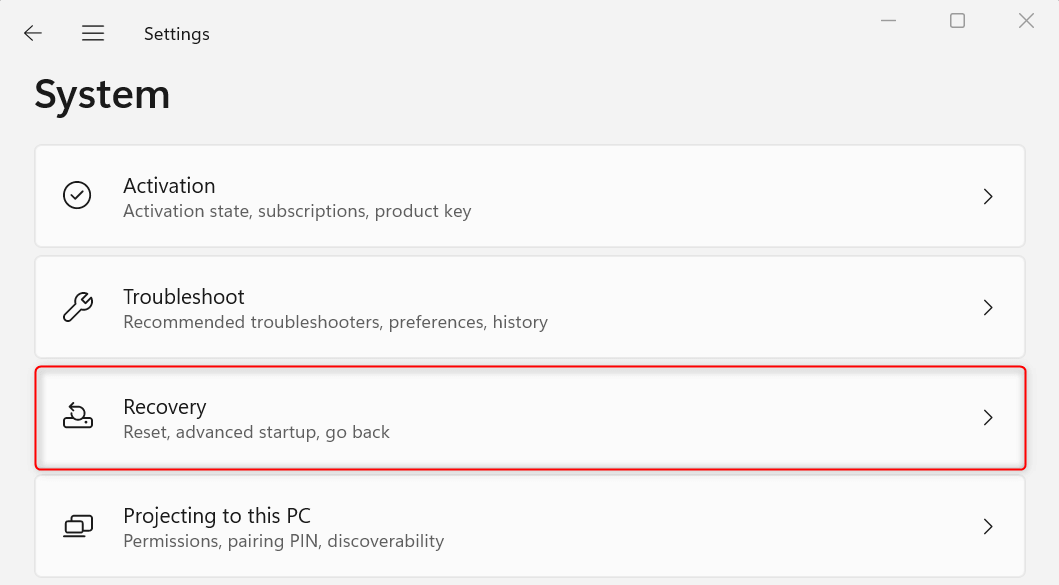
In Windows 11 Settings, navigate to Security > Recovery. If you’re using Windows 10, go to Update & Security > Recovery.
Scroll down to Advanced startup and click its Restart now button. When asked to confirm the action, click Restart now again.

In the blue screen that appears, choose Troubleshoot > Advanced options > UEFI Firmware Settings. Your laptop will now proceed to restart and open BIOS once it boots again. Once there, go to the boot menu of your BIOS and, using your arrow and Enter keys, change the boot order to your USB drive.
Step 4. Install Windows 11
Once your PC boots from the bootable drive, you will see the Windows Setup window. In the beginning interface, choose your preferred language, date and time format, and location. Then, click Next.
Click I accept the license terms and choose Next.
Select all existing partitions on the drive where you want to install Windows 11 and click Delete.
Then, select Drive 0 Unallocated Space and click Next to proceed to install the operating system.
After the installation finishes, you’re halfway done! The rest of the options are now focused on customizing your experience with Windows 11. Just follow along with the on-screen instructions and choose your preferences.
And that’s how you install Tiny11 on a PC. If your machine does have the prerequisites to install the standard Windows 11 version, we recommend you stick with it for better security and system stability.