
- To download a file using Windows PowerShell, run an Invoke-WebRequest command, specifying your download URL and file destination. Execute it by typing .\[File name with extension] and pressing Enter.
- You can create a PowerShell script to automate the download and execution of the file in one go.
Want to download and execute files from the web without leaving your Windows PowerShell window? We’ve got you covered. We’ll show you the steps to do that below, as well as how to automate the entire process using a PowerShell script.
Step 1. Download a File or Script Using PowerShell
There are many ways to download files using PowerShell, but the easiest one to use is the Invoke-WebRequest cmdlet. Here’s how you use it.
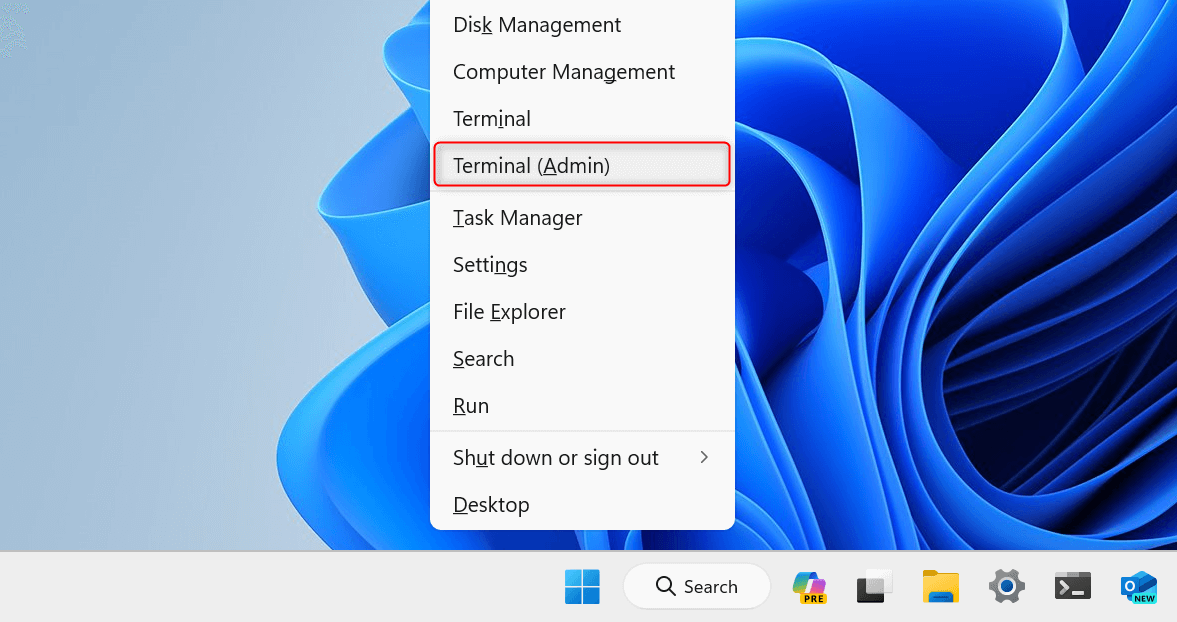
Right-click the Start button to open the Power User menu. From the options listed, choose Terminal (Admin). In the User Account Control dialog, click Yes to proceed.
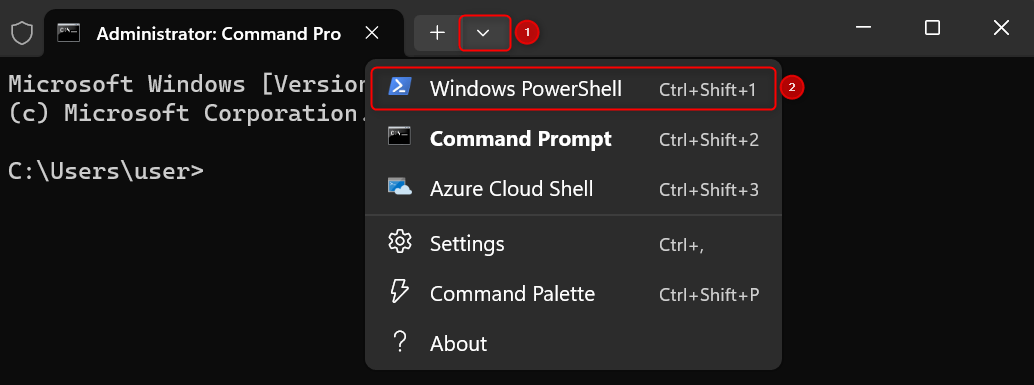
Depending on your preferences, Terminal will launch with either a Command Prompt tab or a Windows PowerShell tab. If a Command Prompt tab opens by default, click the Open a new tab drop-down and choose Windows PowerShell.
Paste the following command in the command line.
Invoke-WebRequest -Uri “[Download URL]” -OutFile “[Path to the save folder]”
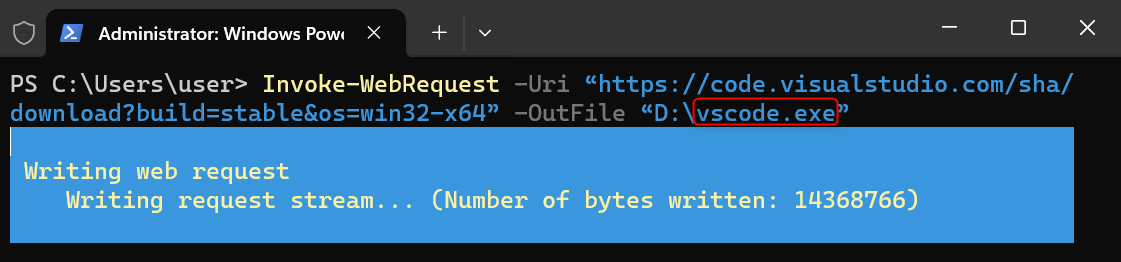
Here’s a quick breakdown of the command and its arguments:
- Invoke-WebRequest: A PowerShell cmdlet that requests something from a website, which is to download a file in this case.
- -Uri “[Download URL]”: Specifies the web address (URL) of the file you want to download. Replace [Download URL] with the actual web address of the file.
- -OutFile “[Path to the save folder]”: Tells PowerShell where to save the downloaded file on your computer. Replace [Path to the save folder] with the actual location where you want the file saved. Make sure to specify your preferred file name with an extension at the end of the path, such as installer.exe, to avoid errors.
After pasting the command and inserting your own arguments, press Enter. PowerShell will now download your file.
Step 2. Execute the Downloaded File Using PowerShell
After downloading your file, proceed to execute it in PowerShell. Make sure that you trust your download source before doing so to avoid issues like virus attacks and malware.
Go to the folder where you saved your downloaded file by running the following command:
cd [Path to the save folder]
PowerShell will indicate your current location, so make sure to check that. Once you’re in the right location, paste the following to the command line and press Enter to execute the downloaded file.
.\[File name with extension]

If you run an executable file, PowerShell will proceed to open or install an application on your computer. Alternatively, it might open a File Explorer window if you run an archive. In other words, what your computer does next will depend on what you choose to download and execute.
Automatically Download and Run Files With PowerShell
PowerShell shows its best capabilities when paired with automation. You can fully automate the process above by creating a script, a file containing a series of PowerShell commands, and running it on your machine.
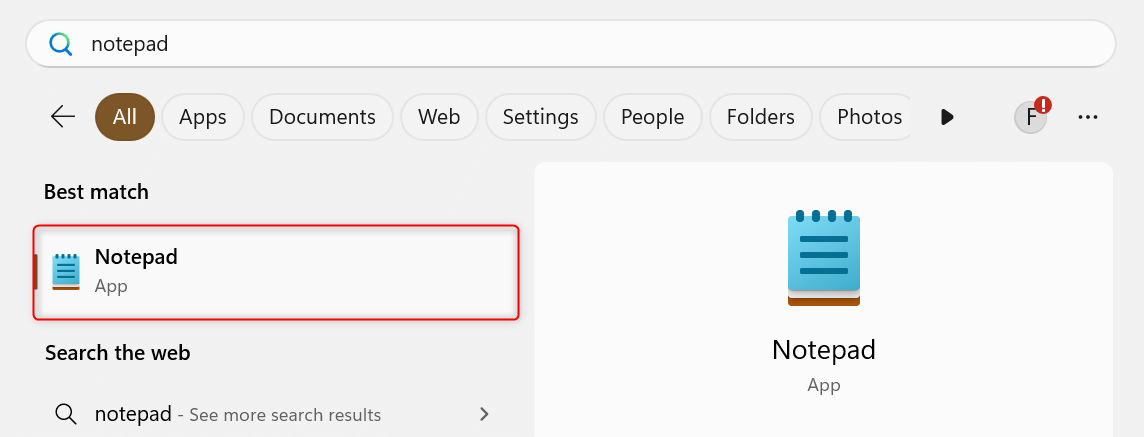
Open the Start menu and type notepad. From the search results, click Notepad.
Next, copy and paste the following commands to your Notepad window.
$url = “[Download URL]”
$save_folder = “[Path to the save folder]”
Invoke-WebRequest -Uri $url -OutFile $save_folder
Start-Process $save_folder
Replace [Download URL] with the file’s download link and [Path to the save folder] with the location where you want it to be stored.
After that, press Ctrl + Shift + S to bring up the Save as window. Select your preferred folder. Click the File name field and enter your preferred name. Then, at the end of the name, type .ps1. Click Save to finish.

To run this PowerShell script later, simply go to the folder where you saved it. Right-click the script file and choose Run with PowerShell from the context menu.

A Terminal window with a PowerShell tab will open on your desktop. It will run the commands inside the script and present updates on the command line. Wait for it to finish and you’re good to go.
If you’re trying to install software using your script, you need to use PowerShell with administrator rights. To do this, right-click the Start menu and click Terminal (Admin). In the User Account Control dialog, choose Yes.
Navigate to the folder where you saved the script using the cd command. Once there, run the following command.
.\[Your script’s file name].ps1
PowerShell will now run your script.
And that’s how you download a file and execute it in PowerShell. If you’re facing issues with PowerShell, knowing its version will be helpful when looking for fixes. Alternatively, update PowerShell on your machine.