Windows 10 clipboard history saves all of the items that you copy on your computer. Whether you’ve copied an image, an app, some text, or anything else for that matter, it’s all saved in the clipboard until and unless you paste it somewhere. It resides in history even after it’s been pasted somewhere.
What that means is, if anyone other than you uses your computer, they’ll have access to this history. They should be able to view what you have copied to your clipboard and they’ll also be able to paste it wherever they want.
If that’s the case and you don’t want anyone to see your clipboard history, you can have it removed. There are multiple ways to clear clipboard on Windows 10 and the following are some of those methods for you.
Use Settings to Clear Clipboard History on Windows 10
If you want to get rid of your entire clipboard history, the Settings app on your Windows 10 machine will let you do it. There’s an entire section dedicated to the clipboard in Settings and you can use it to change various settings of the clipboard on your computer.
Step 1. Use the Start Menu to search for and open the Settings app.
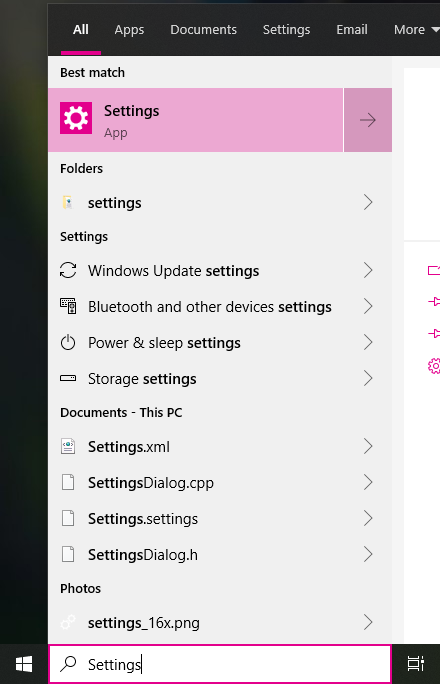
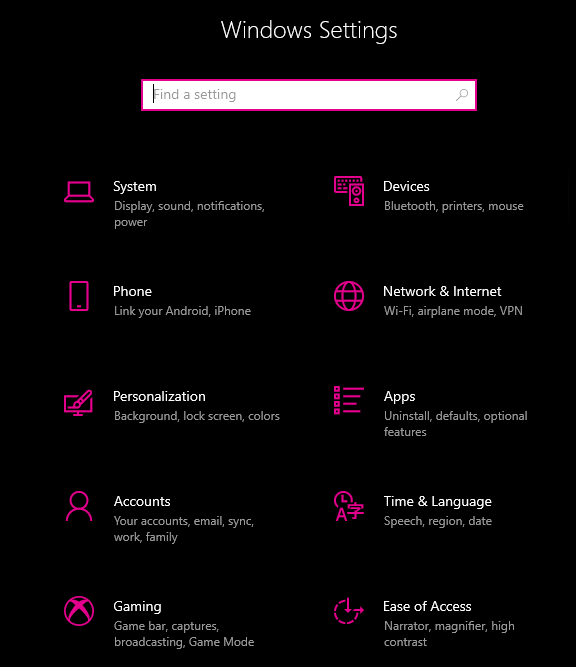
Step 2. When the app opens and you’re shown various options, click on the option that says System to change your system settings.
Step 3. Scroll down in the left sidebar and you’ll find an option that says Clipboard. Click on it and it’ll open your clipboard settings.
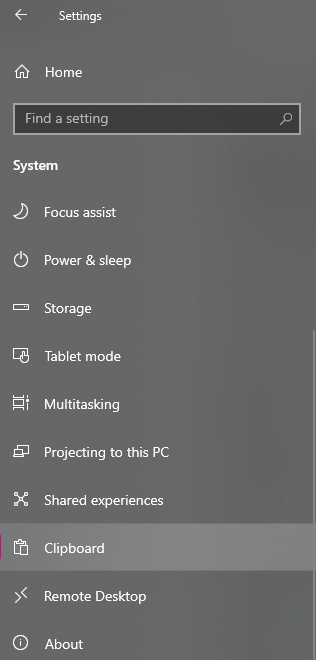
Step 4. On the right-hand side pane, you’ll find a section saying Clear clipboard data. Click on the Clear button inside this section and it’ll clip the clipboard on your Windows 10 computer.
![]()
That’s all there is to it.
Delete Individual Items from the Windows 10 Clipboard History
What the above method does is it removes your entire clipboard history on your machine. However, if you don’t want to do it and you only want to remove certain items from it, you have a method to do it.
The following shows how to remove individual and selective items from your clipboard on Windows 10.
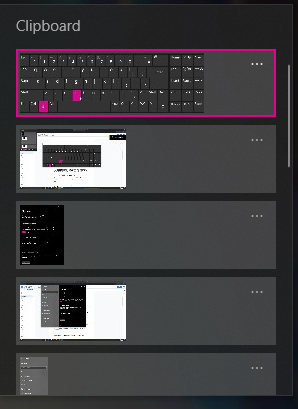
Step 1. While on any screen on your computer, press the Windows + V keys at the same time. It’ll open the clipboard menu.
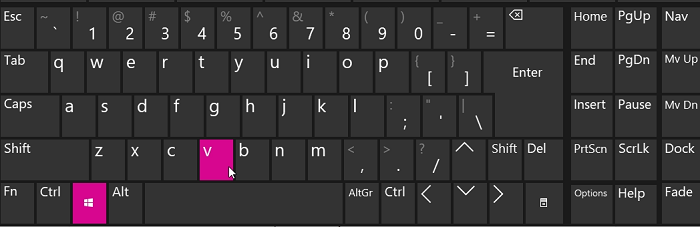
Step 2. You’ll see the items that are stored on your clipboard. Find the one that you no longer need and click on the X icon next to it.
The item should be gone from your clipboard.
Create a Shortcut to Clear Clipboard History
If you’re someone who often needs to clear their clipboard history, you may prefer a more simpler method that requires relatively lesser clicks. There’s actually a way you can create a shortcut that when clicked, removes your clipboard history.
You can create and place the shortcut on your desktop for easy access, and the procedure to create the shortcut is pretty easy actually.
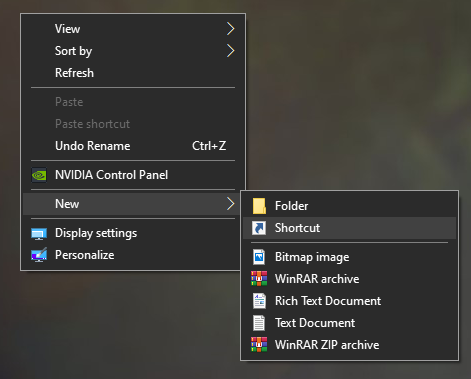
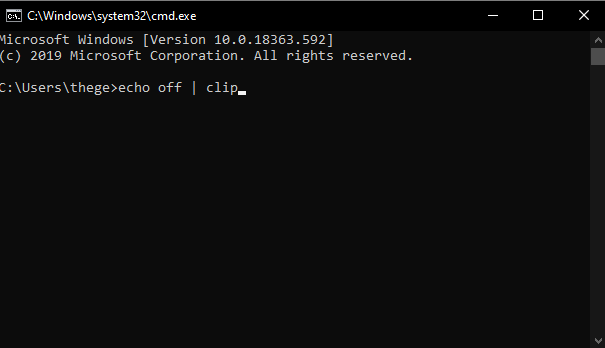
Step 1. Right-click anywhere blank on your desktop, select New, and choose Shortcut. It’ll let you create a new shortcut on your desktop.
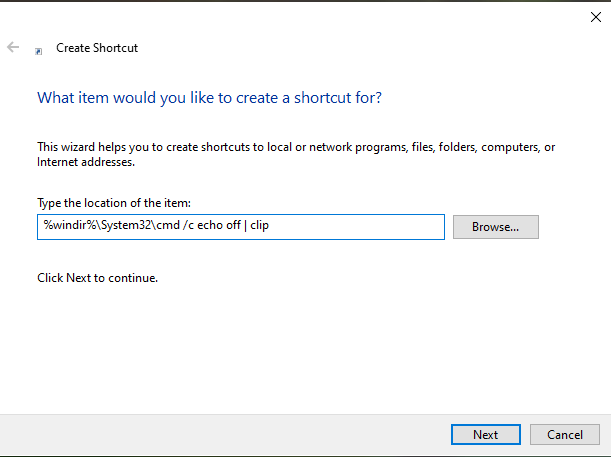
Step 2. On the first screen, it’ll ask you to input the location of the item you want to create a shortcut for. Instead of the location, you want to enter the following text in it and click on Next.
%windir%\System32\cmd /c echo off | clip
Step 3. The following screen asks you to enter a name for the shortcut. You can enter any name you want but it’s highly recommended you use something that explains what the shortcut does. An ideal name would be something like Clear Clipboard History. Then, click on Finish.
![]()
Step 4. From now on, whenever you want to clear your clipboard history, all you need to do is click on the newly created shortcut on your desktop. It’ll get the job done for you.
![]()
Use Command Prompt to Remove Clipboard History
Command Prompt has a ton of commands you can run and get various tasks done on your computer. There’s even a command to clear clipboard on a Windows 10 PC. You can run it in a Command Prompt window and it should erase your entire clipboard history on your machine.
Step 1. Use the Start Menu to search for and open Command Prompt.
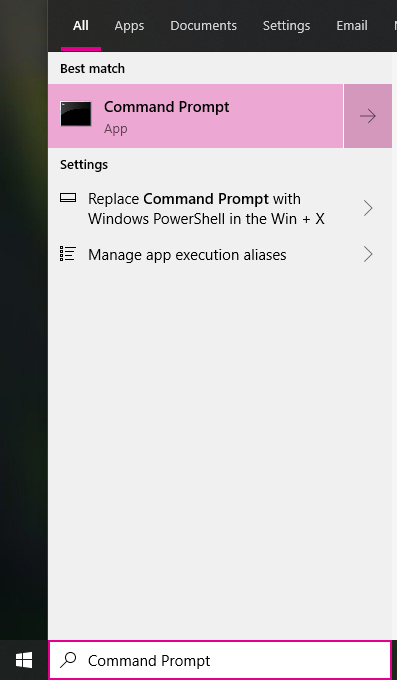
Step 2. When the Command Prompt window opens, type in the following command and press Enter.
echo off | clip
Your clipboard should be cleared when the command is executed.
Add an Option to the Context Menu to Remove Clipboard History
Another easy way to clear clipboard history on Windows 10 is to add the option for it to your context menu. Then wherever you are on your computer, you can access the menu and choose the option to clear your clipboard.
Adding the option to your context menu requires editing your registry, and if you’re fine with it, the following is how you do it.
Step 1. Press the Windows + R keys at the same time, type in regedit, and hit Enter.

Step 2. Navigate to the following path when the registry editor opens.
HKEY_CLASSES_ROOT\Directory\Background\
Step 3. Right-click on the directory that says Shell, select New, and choose Key. It lets you create a new key in the directory.
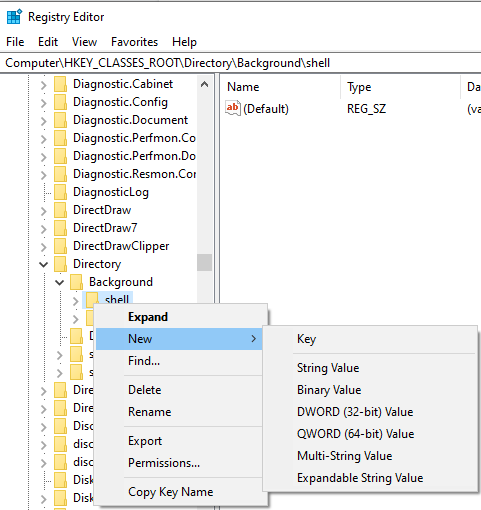
Step 4. Enter Clear Clipboard as the key name and press Enter.
![]()
Step 5. Right-click on the newly created key, select New, and choose Key to create another key.
![]()
Step 6. Use Command as the name of the key and press Enter.
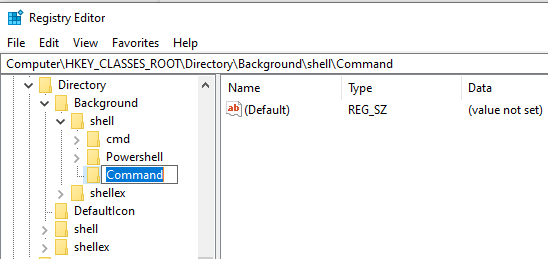
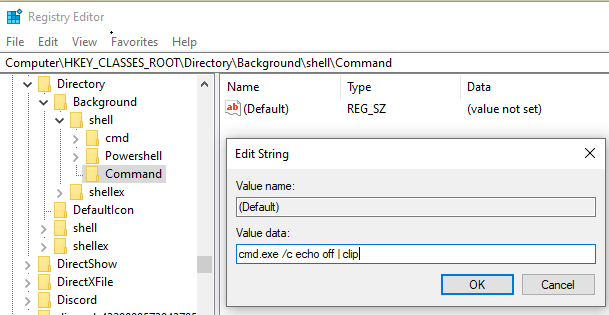
Step 7. You’ll find an entry saying Default on the right-hand side pane. Double-click on it to open it. Then, enter the following value in the Value data field and click on OK.
Step 8. Exit the windows registry.
Step 9. Now right-click anywhere blank on your computer and you should find the option to clear your clipboard history.
![]()
Clearing the Windows 10 clipboard history is extremely easy with all the methods available out there. All you basically need to do is go for one of those methods and it’ll help you get rid of your entire clipboard history.